0. node.js lts 버전을 설치한다. ( 저는 20.16.0 버전을 설치하고 실행했습니다. )
1. 멘딕스 실행후, Blank 웹으로 프로젝트 생성

2. 샘플 엔티티 생성
3. 홈에 Data View 위젯을 추가하고,데이터 소스로 마이크로플로우를 추가한 후, 이름을 DSS_CreateTestObject 로 지정
4. DSS_CreateTestObject 를 아래와 같이 작성
CreateObject 하여서 2의 엔티티를 설정하고, NewEntity 로 리턴변수 선언후 오른쪽 클릭해서 Set $NewEntity as return value 선택
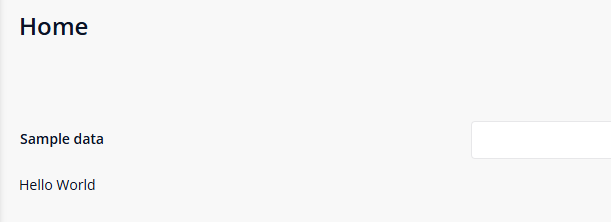
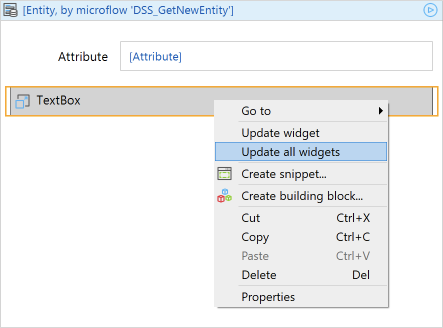
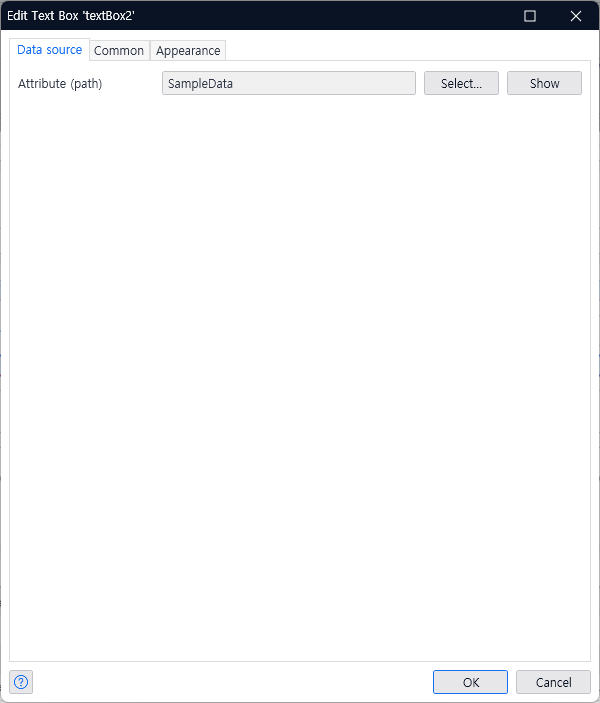
5. Home 페이지로 돌아가서 3에 TextBox 를 추가하고, 2에서 생성한 엔티티의 속성(SampleData)를 선택
6. 플러거블 위젯 생성기를 통해서 아래와 같이 위젯 템플릿 생성
- 생성위치는 멘딕스 프로젝트와 같은 레벨에 생성한다.
예)
SamplePluggableWidget : 멘딕스 프로젝트
myPluggableWidgets : 플러거블 위젯 템플릿
mkdir myPluggableWidgets
cd myPluggableWidgets
npx @mendix/generator-widget TextBox
실행시 나오는 질문에 정보를 입력한다.(문서에 나온것과 동일하게 입력함)
7. 위젯 생성 확인
생성과 동시에 위젯이 생성 되므로, 멘딕스 앱의 widgets 폴더에 생성되어 있음을 확인한다.
회사명.위젯명.mpk 로 생성됨
8. 위젯 적용
멘딕스 스튜디오 프로에서 App > Synchronize App Directory (단축키 : F4 ) 를 클릭하여 동기화 한후,
추가된 위젯을 확인하고,
5에서 생성한 텍스트 박스 밑에 끌어서 적용한다.
프로젝트를 실행해서 잘적용되었는지 확인한다.
9. 위젯 수정
위젯 소스를 열고, src/components/HelloWorldSample.tsx 파일 삭제
src/TextBox.xml 수정
<?xml version="1.0" encoding="utf-8"?>
<widget id="kjbank.textbox.TextBox" pluginWidget="true" needsEntityContext="true" offlineCapable="true"
        supportedPlatform="Web"
        xmlns="http://www.mendix.com/widget/1.0/" xmlns:xsi="http://www.w3.org/2001/XMLSchema-instance"
        xsi:schemaLocation="http://www.mendix.com/widget/1.0/ ../node_modules/mendix/custom_widget.xsd">
    <name>Text Box</name>
    <description>Edit text input</description>
    <icon/>
    <properties>
        <propertyGroup caption="Data source">
            <property key="textAttribute" type="attribute">
                <caption>Attribute (path)</caption>
                <description/>
                <attributeTypes>
                    <attributeType name="String"/>
                </attributeTypes>
            </property>
        </propertyGroup>
    </properties>
</widget>
npm start 를하여 xml 을 반영하도록 한다.
npm start
신규 추가
src/components/TextInput.tsx
import { createElement, ReactElement } from "react";

export interface TextInputProps {
    value: string;
}

export function TextInput({value}: TextInputProps) {
    return <input type="text" value={value} />;
}
** 소스 입력시 prettier 관련 에러가 발생하므로, .eslintrc.js 파일을 아래와 같이 수정
const base = require("@mendix/pluggable-widgets-tools/configs/eslint.ts.base.json");

module.exports = {
    ...base,
    "prettier/prettier": ["error", { "endOfLine": "auto" }]
};
수정 src/TextBox.tsx
import { ReactElement, createElement } from "react";
import { TextBoxContainerProps } from "../typings/TextBoxProps";
import { TextInput } from "./components/TextInput";

import "./ui/TextBox.css";

export function TextBox(props: TextBoxContainerProps): ReactElement {
    const value = props.textAttribute.value || "";
    return <TextInput value={value} />;
}
수정 src/TextBox.editorPreview.tsx
import { ReactElement, createElement } from "react";
import { TextBoxPreviewProps } from "../typings/TextBoxProps";
import { TextInput } from "./components/TextInput";

export function preview({ textAttribute }: TextBoxPreviewProps): ReactElement {
    return <TextInput value={textAttribute} />;
}
10. 위젯 반영
멘딕스 스튜디오에 돌아가 싱크(F4) 후, 페이지에 올려놓은 위젯의 오른쪽 클릭하여, 업데이트를 한다.
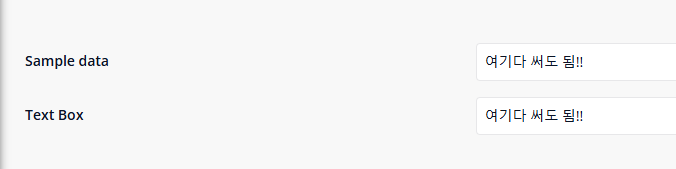
방금 만든 위젯은 텍스트 박스를 지정하면, 그 텍스의 값을 같이 써주는 위젯이다. 위젯을 더블클릭하고, 엔티티를 지정해 준다.
11. 실행 후 확인
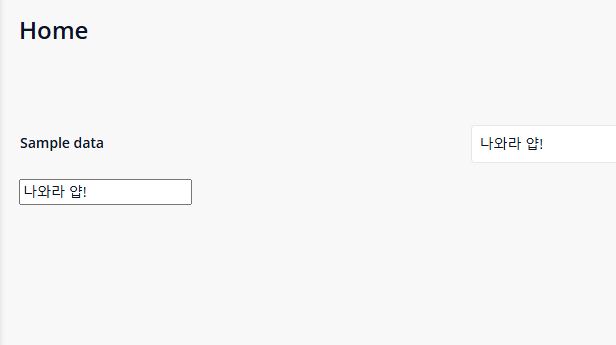
잘되는군요! 오호
12. 스타일링 추가하기
수정 src/TextBox.tsx
import { ReactElement, createElement } from "react";
import { TextBoxContainerProps } from "../typings/TextBoxProps";
import { TextInput } from "./components/TextInput";

import "./ui/TextBox.css";

export function TextBox(props: TextBoxContainerProps): ReactElement {
    const value = props.textAttribute.value || "";
    return <TextInput
        value={value}
        style={props.style}
        className={props.class}
        tabIndex={props.tabIndex}
    />;
}
수정 src/components/TextInput.tsx
import { createElement, ReactElement, CSSProperties } from "react";

export interface TextInputProps {
    value: string;
    className?: string;
    style?: CSSProperties;
    tabIndex?: number;
}

export function TextInput({value, tabIndex, style, className }: TextInputProps): ReactElement {
    return <input
        type="text" value={value}
        className={"form-control " + className}
        style={style}
        tabIndex={tabIndex}
    />;
}
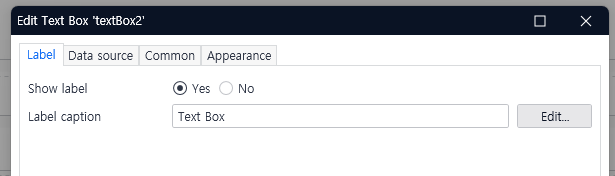
13. 위젯 속성 변경 ( 위젯 정의파일 수정 )
레이블 속성을 추가해서 멘딕스스튜디오 안에서 스타일등을 관리 한다.
수정 src/TextBox.xml
<?xml version="1.0" encoding="utf-8"?>
<widget id="kjbank.textbox.TextBox" pluginWidget="true" needsEntityContext="true" offlineCapable="true"
        supportedPlatform="Web"
        xmlns="http://www.mendix.com/widget/1.0/" xmlns:xsi="http://www.w3.org/2001/XMLSchema-instance"
        xsi:schemaLocation="http://www.mendix.com/widget/1.0/ ../node_modules/mendix/custom_widget.xsd">
    <name>Text Box</name>
    <description>Edit text input</description>
    <icon/>
    <properties>
        <propertyGroup caption="Label">
            <systemProperty key="Label" />
        </propertyGroup>
        <propertyGroup caption="Data source">
            <property key="textAttribute" type="attribute">
                <caption>Attribute (path)</caption>
                <description/>
                <attributeTypes>
                    <attributeType name="String"/>
                </attributeTypes>
            </property>
        </propertyGroup>
    </properties>
</widget>
수정 src/TextBox.tsx
import { ReactElement, createElement } from "react";
import { TextBoxContainerProps } from "../typings/TextBoxProps";
import { TextInput } from "./components/TextInput";

import "./ui/TextBox.css";

export function TextBox(props: TextBoxContainerProps): ReactElement {
    const value = props.textAttribute.value || "";
    return <TextInput
        value={value}
        tabIndex={props.tabIndex}
    />;
}
멘딕스 스튜디오에서 싱크(F4) 후, 위젯 업데이트 하고 확인!
14. 위젯 이벤트 추가하기 ( 변경시 자동 텍스트 박스 업데이트 )
onChange 이벤트 추가
수정 src/components/TextInput.tsx
import { createElement, ReactElement, CSSProperties } from "react";

export interface TextInputProps {
    value: string;
    className?: string;
    style?: CSSProperties;
    tabIndex?: number;
    onChange?: (value: string) => void;
}

export function TextInput({value, onChange, tabIndex, style, className }: TextInputProps): ReactElement {
    return <input
        type="text" value={value}
        onChange={event => {
            onChange?.(event.target.value);
        }}
        className={"form-control " + className}
        style={style}
        tabIndex={tabIndex}
    />;
}
TextBox에 반영
수정 src/TextBox.tsx
import { ReactElement, createElement } from "react";
import { TextBoxContainerProps } from "../typings/TextBoxProps";
import { TextInput } from "./components/TextInput";

import "./ui/TextBox.css";

export function TextBox(props: TextBoxContainerProps): ReactElement {
    const value = props.textAttribute.value || "";
    return <TextInput
        value={value}
        onChange={props.textAttribute.setValue}
        tabIndex={props.tabIndex}
    />;
}
위젯 컴파일 -> 싱크 -> 실행
확인!